Windows 10 Creators Update là phiên bản mới nhất của Microsoft vừa ra mắt người dùng mới đây thôi nhưng nhận được sự ủng hộ rất lớn. Nhiều độc giả Taimienphi.vn gửi về câu hỏi chúng tôi răng đây là phiên bản tốt, nhưng dường như sau khi update xong ổ cứng của họ bị chiếm dụng khá nhiều. Chúng tôi hiểu đây là do Windows.old còn tồn động lại sau khi Update Windows 10 và trong bài viết này Taimienphi.vn sẽ hướng dẫn bạn xóa Windows.old trên Windows 10 Creators Update, phiên bản Previous Windows installions sau khi Update Windows 10 nhé.
Việc ổ cứng của bạn bị đầy, bị chiếm dụng nhiều hơn là do cơ chế trong Windows 10 mỗi khi bạn cập nhật Windows 10 đều có một file được backup lại mang trên Windows.old hay còn một cái tên khác là Previous Windows installations. Windows.old chính là phiên bản Windows trước đó bạn sử dụng trước khi cập nhật Windows 10. Đề phòng trong trường hợp Windows 10 lỗi hoặc phiên bản cập nhật đó khiến bạn không thích bạn có thể quay lại phiên bản cũ ngay lập tức với Windows 10.old

Nhưng không phải ai cũng quan tâm điều này và họ chỉ muốn rằng ổ cứng của mình được giải phóng bớt dung lượng từ Windows.old, nhất là với những ai đang sử dụng ổ SSD thì càng mong muốn xóa Windows.old trên Windows 10 Creators Update. Mặc dù không khuyến khích việc làm này nhưng Taimienphi.vn vẫn sẽ hướng dẫn các bạn cách xóa Previous Windows installations trên Windows 10 Creators Update qua bài viết dưới đây.
Cách Xóa Windows.old trên Windows 10 Creators Update
Có 2 cách giúp bạn xóa Windows.old trên Windows 10 Creators Update và cả 2 cách đều rất đơn giản, dễ thực hiện.
Xóa Windows.old trên Windows 10 Creators Update bằng Disk Cleanup.
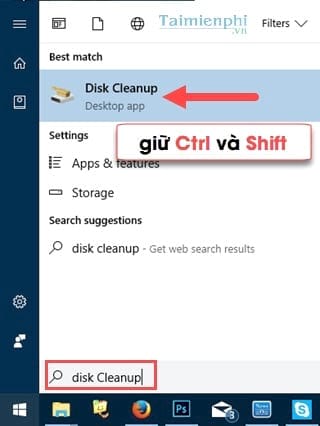
Bước 1: Mở Start Menu gõ "disk cleanup " sau đó giữ Ctrl + Shift và ấn vào Disk Cleanup để mở chế độ Advanced của ứng dụng.

Bước 2: Lựa chọn ổ C để tiến hành xóa Previous Windows installations trên Windows 10 Creators Update.

Thời gian tải của Disk Cleanup ở chế độ này lâu hơn thông thường một chút, bạn đọc hãy đợi cho đến khi tải xong.

Bước 3: Sau khi vào được Disk Cleanup for Windows, chúng ta tìm và xóa Previous Windows installations trên Windows 10 Creators Update, đây chính là file Windows.old theo cách gọi cũ.

Như vậy là chúng ta đã hoàn tất việc xóa Windows.old trên Windows 10 Creators Update rồi đấy, giải phóng được gần 20 GB dung lượng cho máy tính cũng như ổ C rồi.
Xóa Windows.old trên Windows 10 Creators Update sử dụng Storage.
Bước 1: Trên Windows 10 có tích hợp tính năng gọi là Storage cho phép bạn quản lý dung lượng các file, thưu mục có trong máy. Để mở Storage chúng mở Start Menu lên gõ "storage " và truy cập vào kết quả tìm được.

Bước 2: Click chọn ổ C vì Windows.old chỉ nằm trong ổ C mà thôi.

Bước 3: Trong ổ C bạn chọn Temporary .

Bước 4: Trong Temporary click vào Previous version of Windows và lựa chọn Remove files nhé, như vậy là bạn đã xóa Windows.old trên Windows 10 Creators Update rồi đấy.

Hoặc còn 1 cách đơn giản nữa đó là bạn để cho Windows.old tự động xóa bằng cách kích hoạt tính năng Storage sense , sau 30 ngày file sẽ tự động được xóa.

Với các cách mà Taimienphi.vn vừa hướng dẫn xong bạn đã có thể xóa Windows.old trên Windows 10 Creators Update rồi đấy, mặc dù việc xóa Windows.old này giúp máy của bạn giải phóng khoảng 20GB nhưng theo Taimienphi.vn bạn không nên xóa nếu như chưa sao lưu Windows 10 cũ sang ổ, các thiết bị khác đề phòng Windows lỗi. Bạn có thể sử dụng Macrium Refect để giúp bạn làm điều đó, đọc thêm hướng dẫn cách sao lưu Windows 10 bằng Macrium Reflect và làm theo.
https://thuthuat.taimienphi.vn/cach-xoa-windows-old-previous-windows-installations-tren-windows-10-creators-update-22953n.aspx
Windows 10 Creators Update đang khá HOT trong thời gian này, nếu bạn đang dùng Win bản quyền hãy nâng cấp lên Windows 10 Creators Update với tính năng update có trong hệ thống. Còn nếu bạn muốn cài mới Windows 10 Creators bằng USB, tham khảo cách cài Windows 10 Creators bằng USB mà chúng tôi đã hướng dẫn nhé.